Be a Tour Guide to Your Slides
I recently took my children on an amazing safari ride at Disney’s Animal Kingdom. The experience began when we piled into an open-air safari truck, the guide settled in behind the wheel, she clicked on her microphone, and off we went into the wild animal refuge.
On the tour, the driver didn’t simply follow the route, hoping we noticed the exciting things happening all around us. Instead, she was an astute guide. She directed our attention to the family of meerkats on the right, three giraffes on the horizon, and a warthog laying in a dusty patch about 50 yards from the road. As we crested a hill, she stopped and said, “Up ahead on the left is a pond. Look closely along the bank where you’ll see a family of cheetahs.”
Throughout the tour she was constantly telling us two things: where to look and why we should look there, and with each announcement everyone’s heads turned and their weight shifted as they eagerly looked for the next thrilling sight.
This is how presenters should approach presenting complicated slides.
While we advocate for simple, image-first slides, there are times when complex slides–with graphs, charts, images, and analysis–are unavoidable. In these instances, you need to channel your internal tour guide and tell your audience 3 things:
What they’re looking at – When a complex slide first appears, tell your audience what they're looking at. Don’t overwhelm them with detail, instead give them the big-picture, 1-sentence overview of what they’re looking at. This instantly grounds your audience and eliminates ambiguity.
Why they’re looking at it – After the orienting sentence, then tell them why they’re looking at it. This is all about explaining the utility of the displayed information, why it matters, and what conclusions can be drawn from it. In short, you had a reason for showing them the slide, so tell them what it is. Don’t leave it to your audience to figure out why the information is relevant–tell them.
Where they should look – Finally, conclude your slide introduction by telling your audience exactly where, physically, to look on the slide. Give them a concrete starting point so everyone is on the same page and your slide hasn’t become a “choose your own adventure” mystery.
Example A: Bringing the Focus to a Chart

“What you’re looking at is how residential housing is currently categorized in the city. It illustrates just how complicated the current system is, with each of these ‘uses’ having dozens of pages of unique regulation. To start, look at the blue box labeled ‘Special Care’ at the very bottom right of the slide…”
Example B: Bringing the Focus to a Spreadsheet
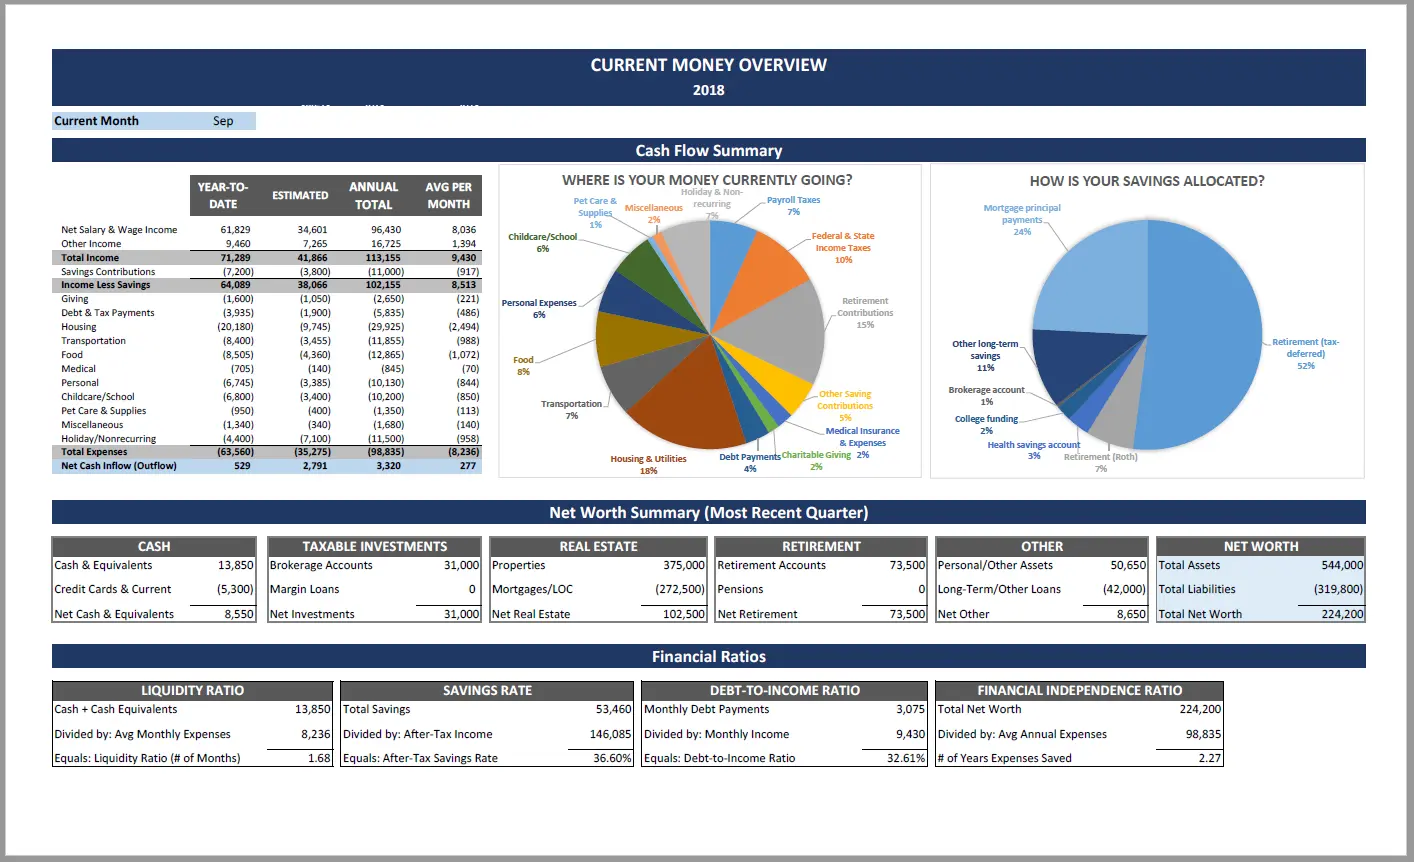
"What you’re looking at is a household’s monthly income and expense –what they’re saving and spending. Tracking all of these variables is necessary to establish a household budget and monitor if each month is within or outside of budget. Let’s start by examining monthly expenditures by looking at the pie chart on the left, and, specifically, the burnt orange wedge at the bottom of the pie labeled, ‘Housing and Utilities.’”
As you can see in the two examples above, being a tour guide helps your audience know what they’re looking at, why they’re looking at it, and where to look.
Whenever you have complicated slides, imagine you’re the tour guide at Animal Kingdom and tell your audience what they’re looking at, why they’re looking at it, and where to look. Doing so will ensure your audience never gets lost in the wild of your powerpoint presentations again.